9 February 2020

Copyright Symbol Icon example in react native

  • Create Components folder under src folder
  • Add CopyrightSymbolIconEXP.js file and add below Code
import React from "react";
import { Platform, StyleSheet, View, Text } from "react-native";

const CopyrightSymbolIconEXP = () => {
  return (
    <View style={styles.MainContainer}>
      <Text>Copyright Symbol © Icon example</Text>
      <Text style={styles.textStyle}> {"\u00A9"}allinoneweb.net </Text>
    </View>
  );
};
export default CopyrightSymbolIconEXP;
const styles = StyleSheet.create({
  MainContainer: {
    flex: 1,
    paddingTop: Platform.OS === "ios" ? 20 : 0,
    alignItems: "center",
    justifyContent: "center"
  },

  textStyle: {
    color: "#000",
    fontSize: 20
  }
});
  • Open App.js file and update code as below
import React from 'react';
import {  Text,View,StyleSheet } from 'react-native';
import CopyrightSymbolIconEXP from './src/Component/CopyrightSymbolIconEXP'

 const  App=()=> {
  return (
    <View style={styles.container}>
      <CopyrightSymbolIconEXP/>
    </View>
  );
}
export default App;

const styles = StyleSheet.create({
  container: {
    flex: 1,
    backgroundColor: '#fff',
    alignItems: 'center',
    paddingTop:80
  },
});


Output:

Circle Oval Shape example in react native

  • Create Components folder under src folder
  • Add CircleOvalShapeEXP1.js file and add below Code
import React from "react";
import { StyleSheet, View } from "react-native";

const CircleOvalShapeEXP1 = () => {
  return (
    <View style={styles.container}>
      <View style={styles.CircleShapeView} />
      <View style={styles.OvalShapeView} />
    </View>
  );
};
export default CircleOvalShapeEXP1;

const styles = StyleSheet.create({
  container: {
    flex: 1,
    justifyContent: "center",
    alignItems: "center",
    margin: 10
  },
  CircleShapeView: {
    width: 150,
    height: 150,
    borderRadius: 150 / 2,
    backgroundColor: "#FF0000"
  },

  OvalShapeView: {
    marginTop: 20,
    width: 100,
    height: 100,
    backgroundColor: "#FF0000",
    borderRadius: 50,
    transform: [{ scaleX: 2 }]
  }
});
  • Open App.js file and update code as below
import React from 'react';
import {  Text,View,StyleSheet } from 'react-native';
 import CircleOvalShapeEXP1 from './src/Component/CircleOvalShapeEXP1'

 const  App=()=> {
  return (
    <View style={styles.container}>
      <CircleOvalShapeEXP1/>
    </View>
  );
}
export default App;

const styles = StyleSheet.create({
  container: {
    flex: 1,
    backgroundColor: '#fff',
    alignItems: 'center',
    paddingTop:80
  },
});


Output:

Button With Rounded Corner example in react native

  • Create Components folder under src folder
  • Add ButtonWithRoundedCorner.js file and add below Code
import React from "react";
import { Text, View, Button, StyleSheet,TouchableHighlight } from "react-native";

const ButtonWithRoundedCorner = () => {
  return (
    <View>
      <Text>Button With Rounded Corner example</Text>
      <TouchableHighlight  style={styles.ButtonStyleClass} >
        <Text style={styles.submitText} >Submit</Text>
      </TouchableHighlight>
    </View>
  );
};
export default ButtonWithRoundedCorner;

const styles = StyleSheet.create({
  ButtonStyleClass: {
    marginRight:40,
    marginLeft:40,
    marginTop:10,
    paddingTop:20,
    paddingBottom:20,
    backgroundColor:'#68a0cf',
    borderRadius:10,
    borderWidth: 1,
    borderColor: '#fff'
  },
  submitText:{
    color:'#fff',
    textAlign:'center',
}
});
  • Open App.js file and update code as below
import React from 'react';
import {  Text,View,StyleSheet } from 'react-native';
 import ButtonWithRoundedCorner from './src/Component/ButtonWithRoundedCorner'

 const  App=()=> {
  return (
    <View style={styles.container}>
      <ButtonWithRoundedCorner/>
    </View>
  );
}
export default App;

const styles = StyleSheet.create({
  container: {
    flex: 1,
    backgroundColor: '#fff',
    alignItems: 'center',
    paddingTop:80
  },
});


Output:


AsyncStorage example in react native

  • Create Components folder under src folder
  • Add AsyncStorageEXP1.js file and add below Code
import React, { Component } from "react";

import {
  StyleSheet,
  View,
  AsyncStorage,
  TextInput,
  Button,
  Alert,
  Text,
  TouchableOpacity
} from "react-native";

export default class AsyncStorageEXP1 extends Component {
  constructor() {
    super();

    this.state = {
      textInputData: "",

      getValue: ""
    };
  }

  setValueLocally = () => {
    AsyncStorage.setItem("Key_27", this.state.textInputData);

    Alert.alert("Value Stored Successfully.");
  };

  getValueLocally = () => {
    AsyncStorage.getItem("Key_27").then(value =>
      this.setState({ getValue: value })
    );
  };

  render() {
    return (
      <View style={styles.MainContainer}>
        <Text>Save Value Locally using AsyncStorage example</Text>

        <TextInput
          placeholder="Enter Some Text here"
          onChangeText={data => this.setState({ textInputData: data })}
          underlineColorAndroid="transparent"
          style={styles.TextInputStyle}
        />

        <TouchableOpacity
          onPress={this.setValueLocally}
          activeOpacity={0.7}
          style={styles.button}
        >
          <Text style={styles.buttonText}> SAVE VALUE LOCALLY </Text>
        </TouchableOpacity>

        <TouchableOpacity
          onPress={this.getValueLocally}
          activeOpacity={0.7}
          style={styles.button}
        >
          <Text style={styles.buttonText}> GET VALUE LOCALLY SAVED </Text>
        </TouchableOpacity>

        <Text style={styles.text}> {this.state.getValue} </Text>
      </View>
    );
  }
}

const styles = StyleSheet.create({
  MainContainer: {
    justifyContent: "center",
    alignItems: "center",
    flex: 1,
    margin: 10
  },

  TextInputStyle: {
    textAlign: "center",
    height: 40,
    width: "100%",
    borderWidth: 1,
    borderColor: "#028b53",
    borderRadius: 10
  },

  button: {
    width: "100%",
    height: 40,
    padding: 10,
    backgroundColor: "#4CAF50",
    borderRadius: 7,
    marginTop: 10
  },

  buttonText: {
    color: "#fff",
    textAlign: "center"
  },

  text: {
    fontSize: 20,
    textAlign: "center"
  }
});
  • Open App.js file and update code as below
import React from 'react';
import {  Text,View,StyleSheet } from 'react-native';
 import AsyncStorageEXP1 from './src/Component/AsyncStorageEXP1'

 const  App=()=> {
  return (
    <View style={styles.container}>
      <AsyncStorageEXP1/>
    </View>
  );
}
export default App;

const styles = StyleSheet.create({
  container: {
    flex: 1,
    backgroundColor: '#fff',
    alignItems: 'center',
    paddingTop:80
  },
});


Output:
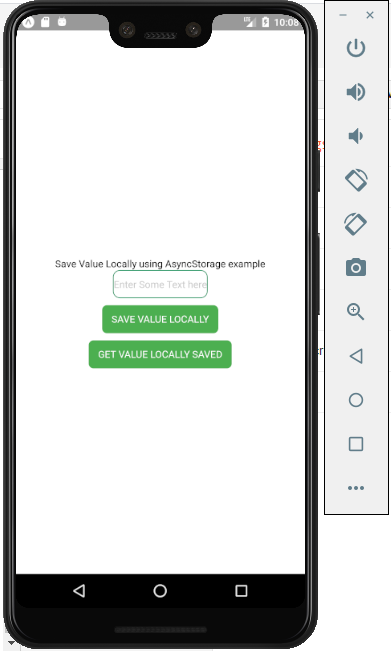
Click on Save value locally button to save the data in locally

Click on get value locally saved button


Alert with options in react native

  • Create Components folder under src folder
  • Add AlertDialogEXP1.js file and add below Code
import React from "react";
import { StyleSheet, View, Button,Alert } from "react-native";

const AlertDialogEXP1 = () => {
  const ShowAlertDialog = () => {
    Alert.alert("Alert Dialog Title", "Alert Dialog Message", [
      {
        text: "Ask me later",
        onPress: () => console.log("Ask me later Button Clicked")
      },
      {
        text: "Cancel",
        onPress: () => console.log("Cancel Button Pressed"),
        style: "cancel"
      },
      { text: "OK", onPress: () => console.log("OK ButtonPressed") }
    ]);
  };
  return (
    <View style={styles.MainContainer}>
      <Button title="Show Alert Dialog " onPress={ShowAlertDialog} />
    </View>
  );
};
export default AlertDialogEXP1;

const styles = StyleSheet.create({
  MainContainer: {
    justifyContent: "center",
    flex: 1,
    margin: 10
  }
});
  • Open App.js file and update code as below
import React from 'react';
import {  Text,View,StyleSheet } from 'react-native';
 import AlertDialogEXP1 from './src/Component/AlertDialogEXP1'

 const  App=()=> {
  return (
    <View style={styles.container}>
      <AlertDialogEXP1/>
    </View>
  );
}
export default App;

const styles = StyleSheet.create({
  container: {
    flex: 1,
    backgroundColor: '#fff',
    alignItems: 'center',
    paddingTop:80
  },
});


Output:


Button example in react native

  • Create Components folder under src folder
  • Add ButtonEXP1.js file and add below Code
import React from "react";
import { Button, View, Text } from "react-native";

const callFun = () => {
  alert("Clicked on Button!!!");
};

const ButtonEXP1 = () => {
  return (
    <View>
      <Text> Button example</Text>
      <Button onPress={callFun} title="Test Button" color="#0000FF" />
    </View>
  );
};
export default ButtonEXP1;
  • Open App.js file and update code as below


import React from 'react';
import {  Text,View,StyleSheet } from 'react-native';
 import ButtonEXP1 from './src/Component/ButtonEXP1'

 const  App=()=> {
  return (
    <View style={styles.container}>
      <ButtonEXP1/>
    </View>
  );
}
export default App;

const styles = StyleSheet.create({
  container: {
    flex: 1,
    backgroundColor: '#fff',
    alignItems: 'center',
    paddingTop:80
  },
});

Output:


3 February 2020

JWT Authentication


OAuth 2.0 and OpenID Connect


  1. OAuth 2.0 and OpenID Connect in below Video


Authenticate with OAuth 2.0

FIDO Authentication

Note: All information taken from https://fidoalliance.org/ website
      
         The FIDO Alliance developed FIDO Authentication standards based on public key cryptography for authentication that is more secure than passwords and SMS OTPs, simpler for consumers to use, and easier for service providers to deploy and manage. FIDO Authentication enables password-only logins to be replaced with secure and fast login experiences across websites and apps.

FIDO Authentication is the Answer to the World's Password Problem
  • Passwords are the root cause of over 80% of data breaches
  • Users have more than 90 online accounts
  • Up to 51% of passwords are reused
  • 1/3 of online purchases abandoned due to forgotten passwords
  • $70: average help desk labor cost for a single password reset
How People Use FIDO
  • FINGERPRINT
  • VOICE
  • SECURITY KEY 
  • FACIAL RECOGNITION
How FIDO Works
         The FIDO protocols use standard public key cryptography techniques to provide stronger authentication. During registration with an online service, the user’s client device creates a new key pair. It retains the private key and registers the public key with the online service. Authentication is done by the client device proving possession of the private key to the service by signing a challenge. The client’s private keys can be used only after they are unlocked locally on the device by the user. The local unlock is accomplished by a user–friendly and secure action such as swiping a finger, entering a PIN, speaking into a microphone, inserting a second–factor device or pressing a button. 
       
          The FIDO protocols are designed from the ground up to protect user privacy. The protocols do not provide information that can be used by different online services to collaborate and track a user across the services. Biometric information, if used, never leaves the user’s device.

FIDO Registration
  • User is prompted to choose an available FIDO authenticator that matches the online service’s acceptance policy. 
  • User unlocks the FIDO authenticator using a fingerprint reader, a button on a second–factor device, securely–entered PIN or other method. 
  • User’s device creates a new public/private key pair unique for the local device, online service and user’s account. 
  • Public key is sent to the online service and associated with the user’s account. The private key and any information about the local authentication method (such as biometric measurements or templates) never leave the local device. 

FIDO Login
  • Online service challenges the user to login with a previously registered device that matches the service’s acceptance policy. 
  • User unlocks the FIDO authenticator using the same method as at Registration time.
  • Device uses the user’s account identifier provided by the service to select the correct key and sign the service’s challenge. 
  • Client device sends the signed challenge back to the service, which verifies it with the stored public key and logs in the user.


Specifications Overview
The FIDO Alliance has published three sets of specifications for simpler, stronger authentication: 
  • FIDO Universal Second Factor (FIDO U2F) 
  • FIDO Universal Authentication Framework (FIDO UAF) 
  • The Client to Authenticator Protocols (CTAP).

2 February 2020

Function component in react native


  • Function component example in react native
import React from 'react';
import {  Text, } from 'react-native';

 const  HomeScreen=()=> {
  return (
      <Text>Adi here...</Text>
  );
}
export default HomeScreen;

Navigation in React Native


  • Install react-navigation in project as below image
    • npm install react-navigation
    • npx expo-cli install react-native-gesture-handler react-native-reanimated react-navigation-stack

  • Add src folder
  • Add screens folder under src
  • Add HomeScreen.js file under screens folder & add below code in that file
import React from 'react';
import { StyleSheet, Text, View } from 'react-native';

export default function HomeScreen() {
  return (
    <View style={styles.container}>
      <Text>Adi here...</Text>
    </View>
  );
}

const styles = StyleSheet.create({
  container: {
    flex: 1,
    backgroundColor: '#fff',
    alignItems: 'center',
    justifyContent: 'center',
  },
});
  • Go to App.js file and update below code
import { createStackNavigator, createAppContainer } from 'react-navigation';
import HomeScreen from './src/screens/HomeScreen'

const navigator = createStackNavigator(
  {
    Home: HomeScreen
  },
  {
    initialRouteName: 'Home',
    defaultNavigationOptions: {
      title: 'App'
    }
  }
);

export default createAppContainer(navigator);
  • By using above code, when you start application it will go to HomeScreen.

Create React Native project using expo


  • Open VS Code terminal & redirect to folder
  • npx expo-cli init my-react-native  (like below)


  • Then Choose a Template as below image

  • It will take time to setup, after setup complete it will show like below image


  • Redirect to project folder and start the project like above image using bellow commands
    • cd my-react-native
    • npm start
  • It will run in browser as below image. Then download expo android app from play store in you mobile and scan below QR code. in mobile you can see react native project output screen.


  • Output like below image